
Growing Sweet Potatoes in Containers: A Beginner’s Guide to Home Cultivation
Sweet potatoes are not only a delicious and nutritious addition to your diet, but they can also be easily grown in containers, making them an ideal choice for home gardeners with limited space. Whether you have a small balcony, patio, or backyard, you can successfully cultivate sweet potatoes in containers. This beginner’s guide will walk you through the steps to grow your very own sweet potatoes at home.

Selecting Containers
Choosing the right containers is the first step towards ensuring the success of your sweet potato cultivation venture. The container you choose will directly impact the growth of both the sweet potato vines and the tubers. Here’s a detailed explanation for beginners on selecting the ideal containers:
Container Size and Depth: Sweet potatoes require ample space for their sprawling vines and room for tuber development. Opt for containers with a minimum depth of 12 inches. This depth allows the sweet potato tubers to grow without restriction, resulting in healthier and more substantial yields.
Container Types: There are several container options to choose from, each with its own advantages. Half-barrels provide plenty of room for growth and can accommodate multiple slips. Grow bags are convenient and lightweight, making them suitable for urban and balcony gardening. Large plastic pots are also suitable, and they come in various styles to match your gardening aesthetics.
Drainage: Proper drainage is essential to prevent waterlogging, which can lead to root rot. Ensure that the chosen container has drainage holes at the bottom. If the container doesn’t have drainage holes, consider drilling a few holes to allow excess water to escape.
Choosing Sweet Potato Varieties
Selecting the right sweet potato variety is important to ensure a successful harvest and a rewarding gardening experience. Here’s a more detailed explanation for beginners:
Flavors, Colors, and Sizes: Sweet potato varieties come in an array of flavors, colors, and sizes. Some are sweeter, while others might have a slightly nutty flavor. Colors range from orange and purple to white and gold. Consider your taste preferences when selecting a variety.
Beginner-Friendly Varieties: For those new to sweet potato cultivation, it’s advisable to start with varieties that are known to perform well in containers. Two popular choices are ‘Beauregard’ and ‘Georgia Jet.’ These varieties have been specifically bred to thrive in various growing conditions and are particularly well-suited for container gardening.
Yield and Growth: Both ‘Beauregard’ and ‘Georgia Jet’ offer reliable yields, making them great choices for beginners. They also have vigorous vine growth, which means your container garden will be lush and visually appealing.
Preparing Soil Mix
Creating the right soil mix is essential for providing your sweet potato plants with the nutrients and environment they need to flourish. Here’s a detailed breakdown for beginners:
Soil Composition: Sweet potatoes thrive in loose, well-draining soil. To achieve this, prepare a soil mix by combining equal parts of high-quality potting soil, compost, and either perlite or vermiculite. This mixture promotes good drainage while retaining essential moisture.
Nutrient Boost: Enhance the soil’s fertility by incorporating a slow-release balanced fertilizer. This provides a steady supply of nutrients throughout the growing season, promoting healthy vine growth and robust tuber development.
Mixing Process: Thoroughly mix the potting soil, compost, and perlite/vermiculite together in a large container or bucket. This ensures an even distribution of materials, resulting in consistent growth conditions for your sweet potatoes.
By following these detailed steps for selecting containers, choosing sweet potato varieties, and preparing the right soil mix, you’ll lay a strong foundation for a successful sweet potato container garden. As you progress through the remaining stages of sweet potato cultivation, you’ll be well-prepared to provide optimal care for your plants and enjoy a bountiful harvest.
Starting with Slips
Starting sweet potato slips is a pivotal step in the process of growing sweet potatoes in containers. These young shoots will eventually grow into lush vines that yield the prized tubers. Here’s a detailed breakdown for beginners on how to successfully initiate the growth of sweet potato slips:
Understanding Sweet Potato Slips:
Sweet potato slips are the sprouts that emerge from mature sweet potatoes. These slips are the foundation for your container garden and will develop into robust vines that produce tubers.
Selecting Source Sweet Potatoes:
Choose sweet potatoes from a reliable source to ensure healthy slip development. You can either purchase sweet potatoes specifically labeled for planting or use store-bought ones. Look for sweet potatoes that are firm, free from blemishes, and have several “eyes” or small dimples on the surface.
Creating Sweet Potato Slips:
- Preparing the Sweet Potato: To create slips, select a healthy sweet potato with several eyes. Gently scrub the sweet potato to remove any dirt or debris, but avoid damaging the eyes.
- Suspending in Water: Insert four toothpicks into the upper third of the sweet potato, evenly spaced around its circumference. The toothpicks will serve as supports to suspend the sweet potato in a jar of water.
- Placing in Water: Position the sweet potato in a jar, with the toothpicks resting on the jar’s rim. Fill the jar with water until the bottom third of the sweet potato is submerged. The eyes should be above the waterline.
- Choosing a Location: Place the jar in a warm, well-lit area. A sunny windowsill or a spot with consistent indirect light is ideal. Sweet potatoes thrive in warmth, and a temperature range of 75-80°F (24-27°C) promotes optimal slip growth.
- Initiating Slip Growth: Within a few weeks, you’ll notice small shoots emerging from the eyes of the sweet potato. These are your sweet potato slips. As the slips grow, their roots will extend into the water.
- Nurturing the Slips: Allow the slips to grow to a length of about 4-6 inches before carefully detaching them from the sweet potato. To do this, gently twist the slips to separate them from the main potato.
Planting Sweet Potatoes
Planting sweet potato slips in your carefully prepared container is a pivotal moment in the journey of cultivating your own sweet potatoes at home. This step sets the stage for the growth of robust vines and the eventual development of delectable tubers. Here’s an in-depth guide for beginners on how to expertly plant sweet potato slips:
Container Preparation:
- Selecting the Container: Make sure you’ve chosen a spacious container with a minimum depth of 12 inches. This depth is crucial to accommodate both the downward growth of tubers and the upward growth of sprawling vines.
- Soil Mix Consideration: Prior to planting, ensure that your container is filled with the well-prepared soil mix you’ve crafted. The mix, consisting of equal parts potting soil, compost, and perlite or vermiculite, provides the ideal growing environment for sweet potatoes.
Planting Process:
- Slip Placement: Gently remove the sweet potato slips from the jar where they were initiated. Handle them carefully to avoid damaging the young shoots or their delicate roots.
- Creating Planting Holes: With your container ready and the soil mix in place, use your fingers or a small trowel to create holes in the soil. These holes should be deep enough to accommodate about two-thirds of each slip’s length.
- Burying the Slips: Hold each slip by the base (the portion without leaves) and insert it into a planting hole. The top leaves should remain above the soil surface. Gently press the soil around the slip to secure it in place while ensuring that the leaves are not buried.
- Spacing: Aim to space the slips approximately 12 inches apart. This spacing provides each plant with enough room to grow without competing for resources. Proper spacing also promotes good air circulation, which helps prevent disease.
- Watering: Once all slips are planted, give them a thorough watering. This helps settle the soil and ensures that the roots are in close contact with the growing medium.
- Placement: Position your container in a location that receives ample sunlight. Sweet potatoes are sun-loving plants and require at least 6-8 hours of direct sunlight daily to thrive.
Caring for Sweet Potatoes
Proper care is essential to ensure the health and vitality of your sweet potato plants as they progress through their growth stages. From maintaining the right moisture levels to managing pests, every aspect of care contributes to a successful harvest. Here’s an in-depth guide for beginners on how to care for your sweet potato container garden:
Watering:
Moisture Balance: Sweet potatoes thrive when the soil is kept consistently moist, but not waterlogged. During the initial growth stages, pay close attention to their water needs.
Monitoring Soil: Check the moisture level of the soil regularly by inserting your finger about an inch deep into the soil. If it feels dry at this depth, it’s time to water. However, if the soil feels damp, hold off on watering to prevent over-saturation.
Watering Technique: When watering, aim to provide a deep soak that reaches the roots. Water until you see excess water draining from the bottom of the container, indicating that the soil has been adequately moistened.
Sunlight:
Ideal Sun Exposure: Sweet potatoes are sun-loving plants that require ample sunlight for vigorous growth. Choose a sunny location for your containers, ensuring they receive 6-8 hours of direct sunlight daily.
Optimal Placement: If you’re limited in terms of sunlight, consider placing the containers on wheeled platforms that can be moved throughout the day to follow the path of the sun.
Fertilization:
Nutrient Boost: To support the growth of your sweet potato plants and encourage robust tuber development, apply a balanced liquid fertilizer every 4-6 weeks during the growing season.
Fertilizer Selection: Choose a fertilizer with a balanced ratio of essential nutrients, such as N-P-K (nitrogen, phosphorus, and potassium). Follow the manufacturer’s instructions for dilution and application.
Vine Care:
Guiding Growth: Sweet potato vines are vigorous growers that can spread extensively. Gently train the vines to stay within the boundaries of the container to avoid crowding or tangling.
Trellising: If you’re using trellises or stakes, guide the vines along these structures to keep them organized and prevent them from sprawling excessively. This also promotes better air circulation, reducing the risk of disease.
Pest and Disease Management:
Regular Inspection: Regularly inspect your sweet potato plants for signs of pests or disease. Look out for aphids, whiteflies, slugs, and other common pests.
Natural Pest Control: If pests are detected, consider using organic pest control methods such as neem oil, insecticidal soap, or introducing beneficial insects like ladybugs to help manage infestations.
Promoting Plant Health: Healthy plants are more resilient against diseases. Maintain proper care practices, including watering, sunlight exposure, and balanced fertilization, to ensure your sweet potatoes have the best chance of warding off diseases.
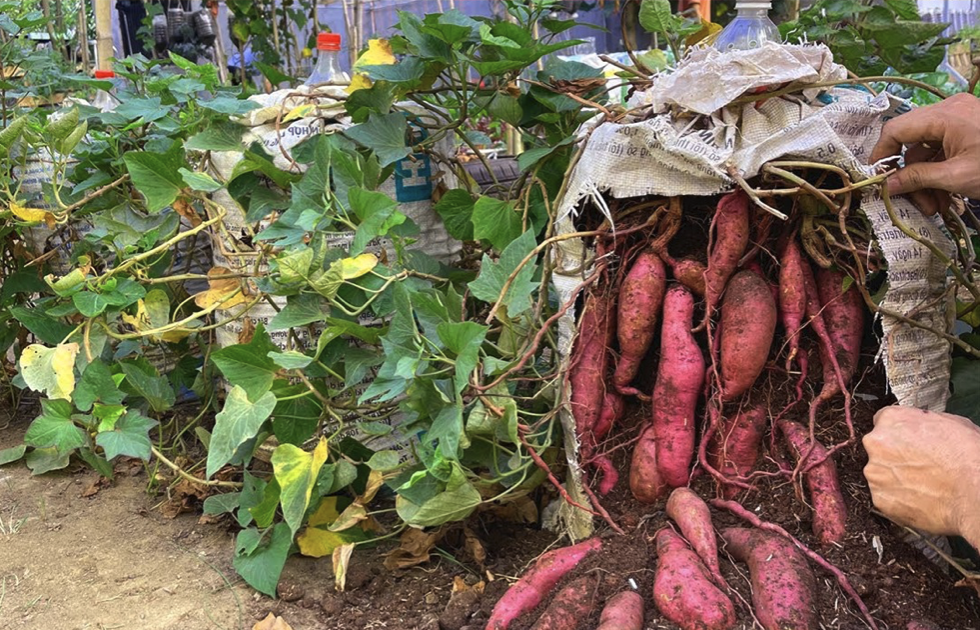
Harvesting Sweet Potatoes
Harvesting sweet potatoes is the culmination of your patient efforts and attentive care throughout the growing season. To ensure you gather the most flavorful and vibrant tubers, it’s crucial to time your harvest correctly and use gentle techniques to extract the roots. Here’s a comprehensive guide for beginners on how to successfully harvest your homegrown sweet potatoes:
Timing the Harvest:
Days to Maturity: Sweet potatoes are typically ready for harvest around 90-120 days after planting, but the exact timing can vary depending on the variety, growing conditions, and climate.
Observing Vine Color: One of the key indicators that it’s time to harvest is the color change of the vines. As the tubers mature, the vines will start to turn yellow and gradually decline. This change in color is a signal that the sweet potatoes are nearing their optimal size and flavor.
Harvesting Technique:
- Prepare Tools: Gather a garden fork, shovel, or digging tool to assist in the harvest process. You’ll want to avoid damaging the delicate tubers while extracting them from the soil.
- Loosening the Soil: Start by gently loosening the soil around the base of the sweet potato plant. Be careful not to dig too close to the plant to prevent accidentally damaging the tubers.
- Lifting the Tubers: Using your chosen tool, carefully dig beneath the plant’s root system. Apply gentle pressure to lift the plant and its attached tubers from the soil.
- Tuber Extraction: Once the plant is lifted, gently shake off excess soil to reveal the cluster of sweet potatoes. Take care not to drop or impact the tubers, as they are delicate and can bruise easily.
- Inspecting Tubers: Examine the harvested tubers for any signs of damage or disease. Set aside any damaged tubers for immediate consumption, as they won’t store well.
Curing and Storing Sweet Potatoes:
Curing Process: After harvesting, sweet potatoes need a curing period to develop their full flavor and sweetness. Place the harvested tubers in a warm, humid location (around 85-90°F or 29-32°C) for about 1-2 weeks. This process allows the tubers’ starches to convert to sugars.
Storage: Once cured, store your sweet potatoes in a cool, dry place with good ventilation. Ideal storage conditions include temperatures around 55-60°F (13-15°C) and relative humidity of 75-80%. Properly stored sweet potatoes can last several months.
Conclusion
Growing sweet potatoes in containers can be a rewarding and satisfying experience for beginners. With proper care and attention to detail, you can enjoy a bountiful harvest of sweet, nutritious tubers right from your home. By selecting the right containers, preparing suitable soil, providing proper care, and watching your plants thrive, you’ll soon be savoring the taste of homegrown sweet potatoes that you cultivated with your own hands.
Do you like this? Share inspiration with your friends!
Source: https://og-oasis.com
DISCLAIMER: THIS WEBSITE DOES NOT PROVIDE MEDICAL ADVICE The information, including but not limited to, text, graphics, images and other material contained on this website are for informational purposes only. The purpose of this website is to promote broad consumer understanding and knowledge of various health topics. It is not intended to be a substitute for professional medical advice, diagnosis or treatment. Always seek the advice of your physician or other qualified health care provider with any questions you may have regarding a medical condition or treatment and before undertaking a new health care regimen, and never disregard professional medical advice or delay in seeking it because of something you have read on this website.